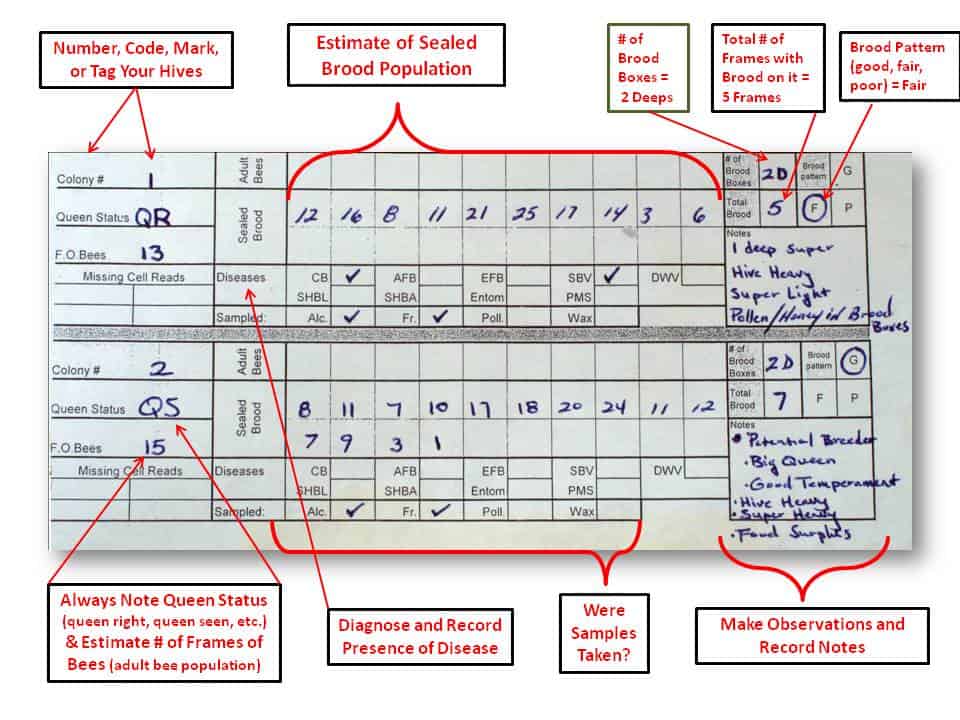
Not taking notes while inspecting your hives is like going to Yellowstone without bringing a camera. You might still get what you want out of the experience but you will have no snapshots of things you might otherwise forget. Organizing your observations into a notebook or spreadsheet during a hive inspection will provide information that can be accessed long after the inspection has taken place. Think of the hive inspection and the field notes that go with them as a snapshot in time. These “snapshots in time” can help a beekeeper track the progress of his hives, head off any potential problems before they occur, and trouble shoot when they do.
The picture above shows a field data sheet that our lab has been using since we started doing field work with the USDA Bee Research Lab, in Beltsville, MD in 2007. It was designed to capture information about certain attributes of a hive during inspections for disease & pest surveys, experiments, and field trials. The spreadsheet is versatile and can be changed to organize different information depending on what attributes are most important at a specific time, location, and situation.
There is a lot of information jammed into this field data sheet but when broken down the attributes it hopes to confine are the most basic in beekeeping. To cover the basics I will briefly touch on the most important attributes of the hive going into more detail as to how and why in future blogs.
For those interested in tracking the progress of their hive(s) over time, the first thing I would suggest is for those beekeepers with more than one hive to devise a system to differentiate one colony from another. Whether you number, code, tag, or mark a hive is your decision, but there is little sense in taking notes or samples if you cannot trace their origins. You can tag all of your colonies if you like or just the ones you plan to inspect and/or sample on a regular/semi-regular basis….
Hive approach is very important when inspecting a hive especially if you are in an apiary with many colonies. Here is how I would approach:
- Gently smoke the entrance
- Crack the lid with smoke
- Keep the sun at your back
- Remove the lid
- Gently smoke again
- Go straight down to the brood nest gently smoking each box on the way down
- Remove outer frames first then move toward the middle
- Find eggs first then look for the queen
- Always put frames back in the same way they came out (unless you are manipulating the colony for management purposes)
- Don’t keep a hive open for more than 15 minutes to prevent robbing
- Slow, deliberate, fluid, smooth are all words that should describe your movements during a hive inspection…find your happy place then begin work.
The most basic hive inspection should include the following:
- Estimate of the adult bee population:
- Accomplished by estimating the number of frames of bees in a hive
- Estimate of the juvenile bee population:
- Accomplished by estimating the number of frames of brood in a hive
- Queen Status:
- Accomplished by seeing the queen, identifying freshly laid eggs, identifying the presence or absence of a virgin, drone layer, or laying worker.
- Categorizing brood pattern (good, fair, poor)
- Presence of brood and adult honey bee diseases/viruses:
- Accomplished through disease diagnosis in the hive (see blogs by Rob Snyder)
Now that you know how to approach the hive and have a good idea of the kinds of things you want to look for its time to start the inspection. The first thing I like to do during my hive inspection is to estimate the population of adult bees in the hive. Next week I will go over estimating frames of bees and from there I will get into some of the other points of inspection…